How to use Square's OkHttp Java library to access Workspace ONE UEM API's
Digital workspace solutions often require consuming other services. When doing so, you may work with things like; REST API
endpoints, Webhooks, gRPC, GraphQL - the list goes on. You can interact with these in a number of ways, but one way I've come to appreciate is with Java. It has been especially helpful when I've wanted to work with libraries like Appium, Selenium, OKHttp, or the Workspace ONE UEM SDK in a workflow. With that, I thought it would be
helpful to share how to work with Workspace ONE UEM API's using Java. In this blog post, we will cover;
Why Java?
- Basics of JetBrain's IntelliJ IDE, touching on Apache Maven
-
Using Square's OkHttp library to
call Workspace ONE UEM API's

Why Java?
Java is used by many and supported by most (Docker, Kubernetes, static code
analysis tools, cloud service providers, Android, Windows, macOS, Tanzu
Application Service, etc). Many languages compile to
java bytecode (Kotlin, Scala, Groovy); which is to say if you know Java, you can
pivot to any of these languages that compiles to java bytecode. Some examples of
where Java has enabled me;
- writing end-to-end mobile automation tests with Appium and Selenium libraries; capturing performance metrics, and writing data to Splunk HTTP Endpoint Collector
- interacting with API endpoints in Workspace ONE UEM
- testing Firebase Cloud Message delivery on Android native client applications
- performing OAuth authentication with Strava fitness API's
- retrieving power output details from SolarEdge inverter API's
- Deserializing data, using certificates to authenticate to CockroachDB on Google Cloud, and writing the data to a table
You just can't go wrong with a little Java in your life.
The Setup:
- JetBrain's IntelliJ Community Edition
- Maven
- Square OkHttp library
- JDK
For the sake of simplicity, we will assume you have some of the basics
covered, such as;
- IntelliJ installed
- JDK installed
- Environment variables specified for JAVA_HOME
- Workspace ONE UEM API key obtained
- Account with read access to Workspace ONE UEM REST API
To verify environment variables are correctly specified, enter 'env' in
Terminal, and look for JAVA_HOME
|
|
| reference. |
Making REST API calls to Workspace ONE UEM with Java:
-
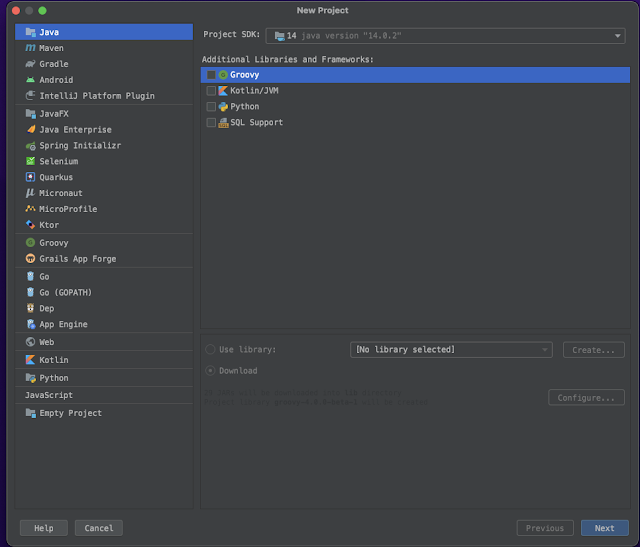
Open IntelliJ
-
Create a New Project

-
Click 'Next', followed by 'Next', name the project
RESTExample and click 'Finish'


-
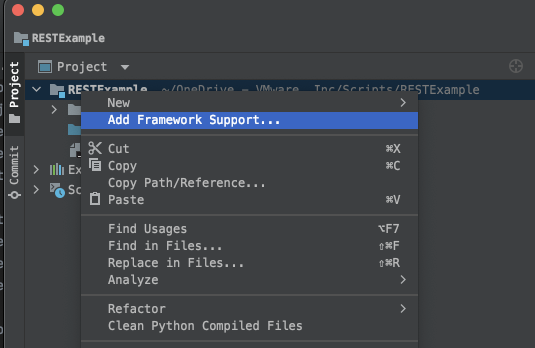
In the upper left corner, right click the RESTExample project,
and click 'Add Framework Support...'
-
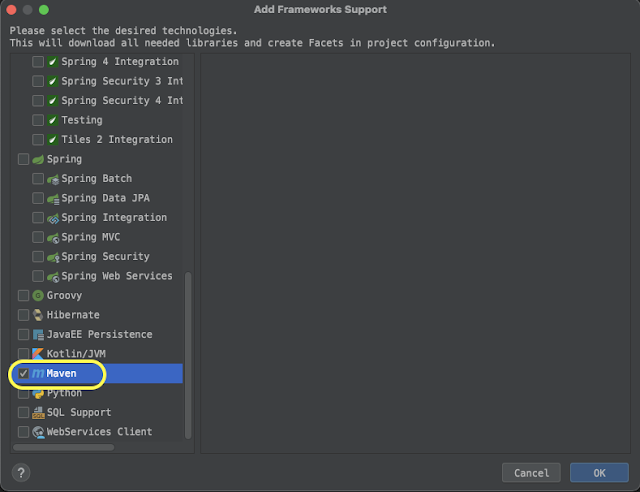
Scroll down until you find Maven, and select Maven, followed
by 'OK'
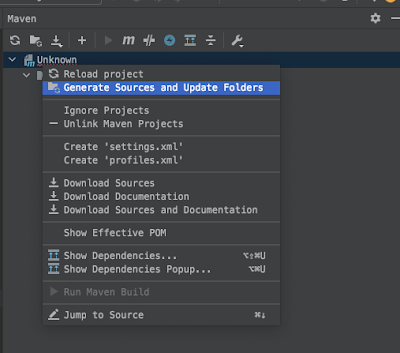
- In the Maven window, right click on 'Unknown' and click 'Reload project', followed by 'Generate Sources and Update Folders'
-
Maven will update the name of the artifactId to correctly
show RESTExample

-
Inside the project, some new folders will be created for
you
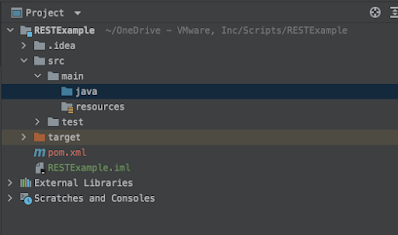
-
Right click on java and click New -> Java Class

-
Name the Java class com.vmware.restexample and hit return

-
Now we have a empty Java class created for us

-
On line 4, paste the code below.
-
The code will look like this;
-
One shortcut I use to create boilerplate code for OkHttp
requests is to leverage Postman. Open Postman, and make an
API call to Workspace ONE UEM. On the right side of
postman, tap the code button
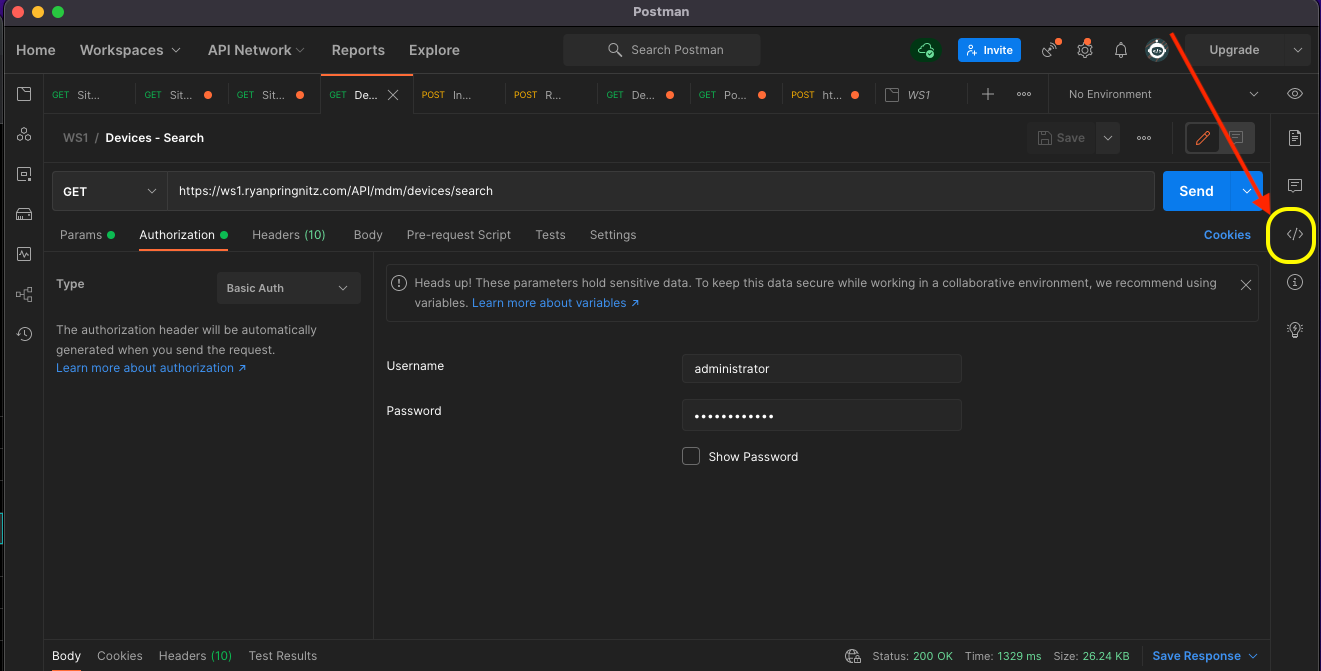
-
In the dropdown box, look for 'Java - OkHttp'
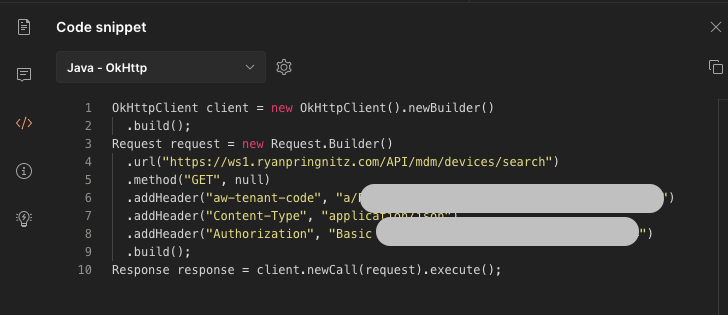
-
Select the code snippet, and copy it to your
clipboard
-
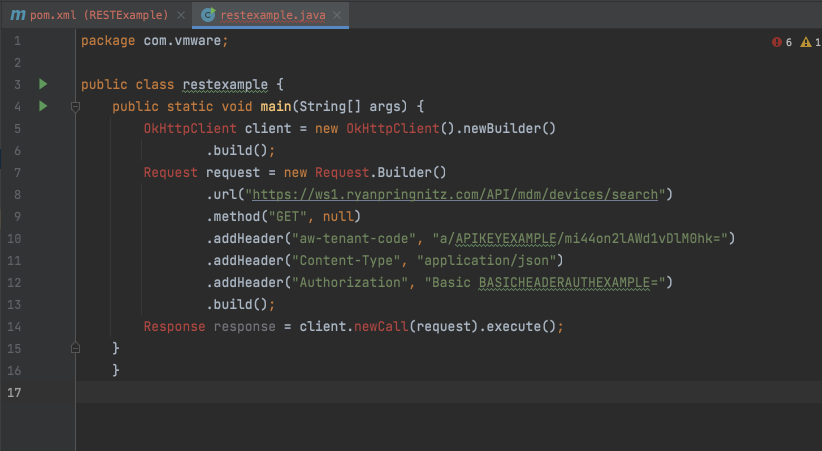
On line 5, paste in the code from Postman. Note: line 10 has your API key. This would have been provided in Postman, and obtained from your Workspace ONE UEM environment. Line 12 has Basic Header authentication, containing base64 encoded credentials. These credentials (user/pass) would have been provided in Postman previously, and converted to base64 in the code sample provided by Postman.
-
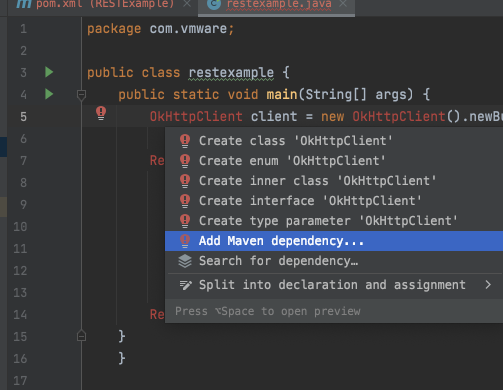
Right click on 'OkHttpClient on line 5, and click 'Show
Context Actions'

-
Click 'Add Maven dependency'. This will allow us to add the missing library.
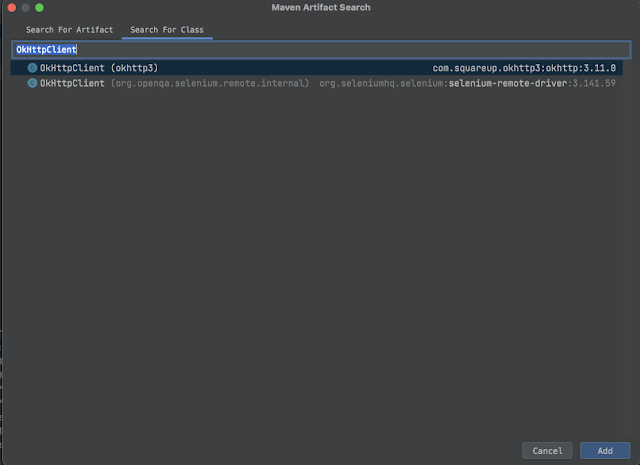
-
In the new window that appears, make sure the
com.squareup.okhttp:okhttp:3.11.0 library is selected, and
click 'Add'
-
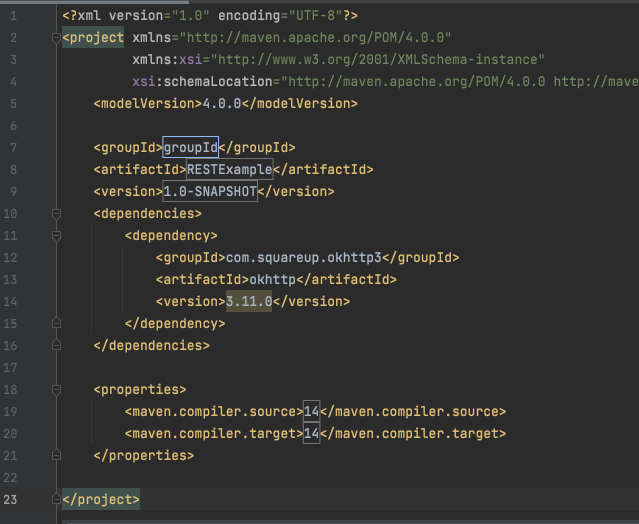
While nothing appears to have happened, the pom.xml file
was updated with the dependency. Note: this a particularly old version of OkHttp that was automatically added. You can use more recent versions such as 4.9.x. You can find samples from MvnRepository.
-
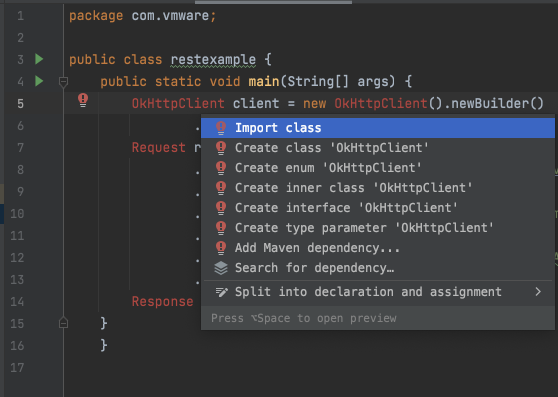
The dependency has been added to the project, but not
imported in the class. To do this, right click on
OkHttpClient again, click 'Show Context Actions', and you
will be able to select 'Import Class'
-
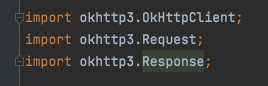
This needs to be done two more times for Request and
Response


- Three lines have been added to the class, these import
statements allow you to use the OkHttp library in any
methods within the class
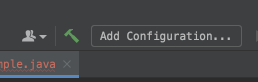
-
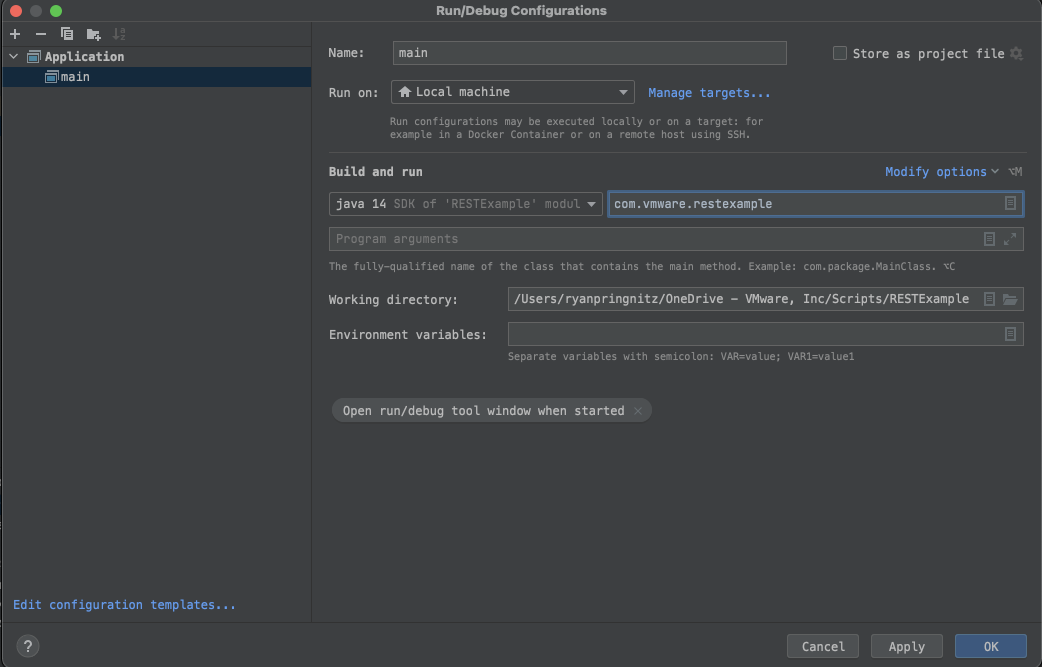
To run the code, click 'Add Configuration' in the upper
right corner
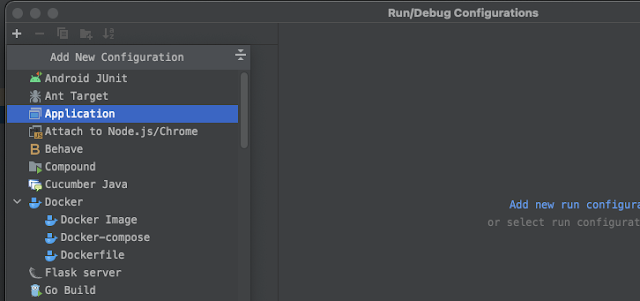
-
In the new window that appears, click the + symbol in the
upper left corner, followed by 'Application'
-
Name the configuration 'main'
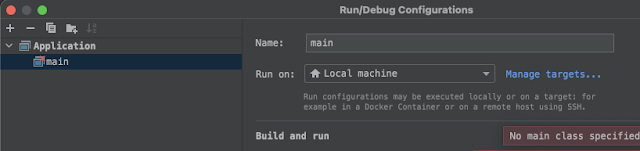
-
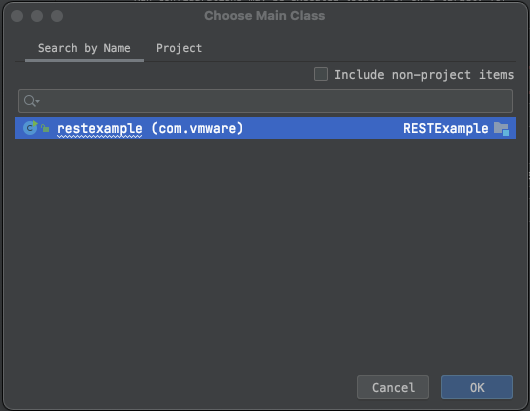
Select the little box within the box that says 'Main
class'
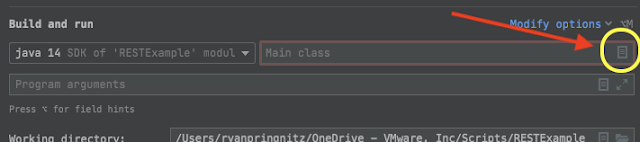
-
If the class is highlighted, click 'OK'
-
Click 'OK' again
-
In the upper right corner of the IDE, you will notice some
buttons appear. These are the run, debug, and run with code
coverage buttons

-
Hover over the red line on line 18. Notice we have an
unhandled exception. Java is a compiled language, and to
compile the project, you will need to handle this
exception.

-
Right click on execute (with the red underline on line
18)

-
Two options are presented. The better choice for us will be
to 'Surround with try/catch', and we will click this
-
A try/catch block was automatically generated for
you.

-
After line 24, hit the return key, and type
sout
-
Hit tab, and IntelliJ will auto-generate
System.out.println
-
Within the parenthesis, type "Workspace ONE UEM REST API
Response:" + response
(note: don't forget, Java statements need to be ended with a semicolon
-
The response variable is no longer in scope now, to correct
this, right click on response on line 25, and click ''Bring
response' into scope'

-
The response variable is instantiated before the try/catch
block. This allows the contents of the variable to be
referenced outside of the try/catch block, like we are
trying to do in the System.out.println statement
Now, the code is ready to be ran. We can add a breakpoint on
line 26, and click the little green debug to have the code stop executing at the breakpoint. When the code hits the breakpoint, the debugger will appear, and allow
you to see the contents of the currently instantiated
variables.

In the HTTP Response, there is a body containing all of
the data. If you wish to see this data, just to spotcheck your
response you can evaluate the expression by clicking the little
calculator in 'Debugger'

In the new window that appears, just type:
response.body().string();
Then click 'Evaluate', and you will will see the results from
the REST API response

Below is a Gist example of the code you would be expected
to implement. Lines 14, 16 and 18 would need to be updated
with the API key, base64 encoded credentials, and REST API
URL.
While this is not meant to demonstrate a solution to a
particular problem or business need; this exercise allowed
you to familiarize yourself with the IntelliJ IDE, start
using a build tool like Maven to manage dependencies,
leverage Square's OkHttp Java library, and ultimately perform a
HTTP Request against a Workspace ONE UEM API endpoint. For those newer to Java, and working with Workspace ONE UEM API's, this will serve as a good introduction.
Maven will update the name of the artifactId to correctly
show RESTExample
Right click on java and click New -> Java Class
Name the Java class com.vmware.restexample and hit return
Now we have a empty Java class created for us
On line 4, paste the code below.
The code will look like this;
In the new window that appears, make sure the
com.squareup.okhttp:okhttp:3.11.0 library is selected, and
click 'Add'
While nothing appears to have happened, the pom.xml file
was updated with the dependency. Note: this a particularly old version of OkHttp that was automatically added. You can use more recent versions such as 4.9.x. You can find samples from MvnRepository.
The dependency has been added to the project, but not
imported in the class. To do this, right click on
OkHttpClient again, click 'Show Context Actions', and you
will be able to select 'Import Class'
This needs to be done two more times for Request and
Response
Three lines have been added to the class, these import
statements allow you to use the OkHttp library in any
methods within the class
To run the code, click 'Add Configuration' in the upper
right corner
In the new window that appears, click the + symbol in the
upper left corner, followed by 'Application'
Name the configuration 'main'
Select the little box within the box that says 'Main
class'
If the class is highlighted, click 'OK'
Click 'OK' again
In the upper right corner of the IDE, you will notice some
buttons appear. These are the run, debug, and run with code
coverage buttons
Hover over the red line on line 18. Notice we have an
unhandled exception. Java is a compiled language, and to
compile the project, you will need to handle this
exception.
Right click on execute (with the red underline on line
18)
Two options are presented. The better choice for us will be
to 'Surround with try/catch', and we will click this
A try/catch block was automatically generated for
you.
After line 24, hit the return key, and type
sout
sout
Hit tab, and IntelliJ will auto-generate
System.out.println
Within the parenthesis, type "Workspace ONE UEM REST API
Response:" + response
(note: don't forget, Java statements need to be ended with a semicolon
(note: don't forget, Java statements need to be ended with a semicolon
The response variable is no longer in scope now, to correct
this, right click on response on line 25, and click ''Bring
response' into scope'
The response variable is instantiated before the try/catch
block. This allows the contents of the variable to be
referenced outside of the try/catch block, like we are
trying to do in the System.out.println statement
In the HTTP Response, there is a body containing all of the data. If you wish to see this data, just to spotcheck your response you can evaluate the expression by clicking the little calculator in 'Debugger'
In the new window that appears, just type:
response.body().string();
Then click 'Evaluate', and you will will see the results from
the REST API responseresponse.body().string();
Below is a Gist example of the code you would be expected
to implement. Lines 14, 16 and 18 would need to be updated
with the API key, base64 encoded credentials, and REST API
URL.
While this is not meant to demonstrate a solution to a
particular problem or business need; this exercise allowed
you to familiarize yourself with the IntelliJ IDE, start
using a build tool like Maven to manage dependencies,
leverage Square's OkHttp Java library, and ultimately perform a
HTTP Request against a Workspace ONE UEM API endpoint. For those newer to Java, and working with Workspace ONE UEM API's, this will serve as a good introduction.


Comments
Post a Comment